Monday, December 28, 2009

Baked Brie Heaven

Oh Paula Deen! That is all I have to say! She has done it again!


I went in search for a yummy baked brie recipe for one of the Christmas parties we had and I found just what I was looking for! Brie is one of my favorite cheeses and it only gets tastier when it is melted between some flaky puff pastry with sweet raspberry jam and toasted pecans!


First melt a tablespoon of butter in a sauce pan and then add 1/2 cup of chopped pecans or walnuts. Add 1/8 teaspoon of the cinnamon and stir over the heat until the butter browns and the nuts are toasted.


Then roll out the pastry dough so that it is large enough to wrap around the brie and toppings. Her recipe is for an 8 oz. wheel of brie, but I doubled it and used a 1 lb. wheel. The more the better!


Whipping up the eggs a bit...


Then I got the brie ready by topping it with the nuts and the jam.


Then washing the egg on both sides of the puff pastry for that golden crispy layer!


Wrapping up all the goodness!


The baked beauty! This is such a decadent treat! Best served with some chilled white wine or some of my
sassy spicy cider! ;)


Cheers to decadent brie heaven!
xoxo,
Tipsy


Italian Cream Cake Remix

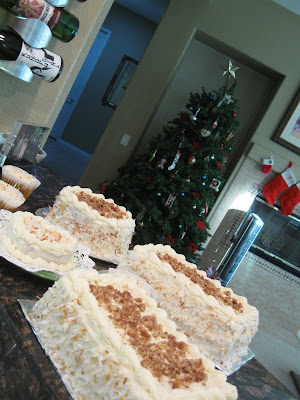
With so many places to go I had to turn my kitchen into a bakery like never before! I had made a yummy Italian Cream Cake for someone at work and because it was for them, I didn't actually get to really try it. I just snooped a tiny morsel...so it was time to make one (or maybe 3 or 4) that I could sink my teeth into.

I found a great recipe at this Tasty Kitchen site...one of my new found favs.

I toasted the pecans in butter and brown sugar....these little bebes are irresistible by themselves!


Then, I toasted the coconut.


I made a few different sizes...using all the different pans that I had....of course, the little heart is for the hubs.


Getting the frosting and coconut coating going.


The many finished products..,

All the yummy pecans and coconut inside the rich cake! This is the richest tasting, non-chocolate cake evah!


Cheers to some rich Italian Cream Cake and many many parties! Even Tipsy is ALL partied out! Can you believe it!
Cheers to good times with friends and families and eating until you can't eat anymore!....and hopefully sticking with some New Years resolutions to undo the damage.
xoxo,
Tipsy

Thursday, December 24, 2009

Sassy Spicy Cider

After braving the malls and party after party, the hubs and I are always ready for a little at home relaxation!

Our good friend Jeremy taught us this little delight and I added my lazy mans touch to it!

You can buy mulling spices at the store, heat the cider up with the spices and then strain them out. I went for the Starbucks Chai Tea Bag (lazy) approach. Once the cider is spicy enough, just remove them.

Once the cider is hot and spicy, pour it into your mug of choice and then add the sassy part. I went with DeWar's, but Crown Royal is delightful as well.

To measure the sassy addition, or not to measure? That is the question. Tipsy says-add to taste, but feel free to measure if you would like to know just what you are getting yourself into!


This little Holiday bevee is sure to make you warm...and toasty!
Enjoy with your favorite Holiday cheeses and treats.
Cheers to the Holidays! Merry Merry Christmas and much love to everyone!
xoxo,
Tipsy


Tuesday, December 8, 2009

Pumpkin Obsession Finale

So, I know I got carried away with the pumpkin, but I love me some pumpkin! This is officially my last pumpkin creation for this Holiday season that I will admit to making!


My sassy cousin Kaitlyn shared this recipe with me after she made my Thanksgiving with it and I made it for my Thanksgiving II with the hubs and friends. It turned out so good and I think it is because this recipe actually uses a whole can of pumpkin...the more, the better!


Thanks Kaitlyn Rose!


3 eggs beat

1 cup sugar

1 can pumpkin

3/4 cup flour

1 teaspoon baking soda

2 teaspoon cinnamon


Mix together and pour on a cookie sheet that has sides. I lined mine with parchment paper and plenty of pam.


Bake for 15-20 minutes at 375 degrees. If you line the pan with the parchment paper and pam you can place the whole pan in the fridge for 20 minutes after it bakes. If not, turn the cake out onto a waxed paper covered in powdered sugar and then refrigerate. The cake is very sticky, so I would definitely recommend the parchment paper and pam option.


Mix up the filling:

1 cup powdered sugar

8 oz. cream cheese (soft)

4 tablespoons butter (soft)

1/2 teaspoon vanilla


Spread over the cake.


ROLL it up and then sprinkle powdered sugar on top. Mine looked a bit messy and split on the side, but it tasted so good and once you slice & serve it you can't see any of the flaws.


Sliced and delish!


Cheers to the pumpkin spice flavor that just brings in the Holiday feel! I love it!


xoxo,

Tipsy


Pumpkin Treats Meant for Breakfast

After eating cookies for breakfast I thought it would make sense to actually make a pumpkin scone breakfast!


I went with a recipe that looked delish..and I had some extra buttermilk in the fridge from my last Red Velvet Adventure!


2 cups flour

1/3 cup brown sugar

1/2 teaspoon nutmeg

1/2 teaspoon cinnamon

1 teaspoon baking powder

1/4 teaspoon salt

1/2 teaspoon soda

1/2 cup cold butter (cut into small pieces)

1/3 cup cold buttermilk

1/2 cup pumpkin

1 teaspoon vanilla


First, mix up the dry ingredients and then use the pastry cutter to cut in the butter.


Mix the buttermilk, vanilla, pumpkin in a separate bowl.


Combine-don't over mix. Then knead into a circle and cut into 8 slices.


Mix up an egg wash with 1 egg and 1 tablespoon of milk. Wash each slice.


Bake at 400 degrees for 20 minutes.


Cut in half and cover with butter! Sooooooo yummy and you just get the feeling of Fall with one of these to start your day!


Cheers to the Fall and my pumpkin obsession!


xoxo,

Tipsy


Passing on Delicious Traditions

My sweet and super creative friend, Luna, wanted a little lesson in pie baking! I have done many events with her and she is a phenomenal florist! We finally had a day off at the same time and couldn't wait to get some baking going. After my Pie with the Queen lesson I felt totally prepared for some Sunday Funday Tipsy Baking lessons!


We started with some huge Washington Apples from Costco. These bebes were juicy and delicious!


We sliced them up and added 2 tablespoons of Tapioca, 1.5 teaspoons cinnamon, 1/4 teaspoon nutmeg, 1 cup sugar, splash of vanilla and a squeeze of lemon juice to get the flavors going.....instantly made the whole house smell DELISH!!!


Then for the dough! The most important part! Fruit can do it's job easy...but the crust needs much work and help! We just had to bust out the Sauvignon Blanc to make it happen!


We used Granny's Recipe, of course!


Stirring up the filling again...maybe an excuse to smell this deliciousness!


Luna loves photography and I think she is hired full time for my blog...if only I can pay her in sweets! I think this is my favorite pic that I have posted!


After covering the pie with crust we made the slits for steam.


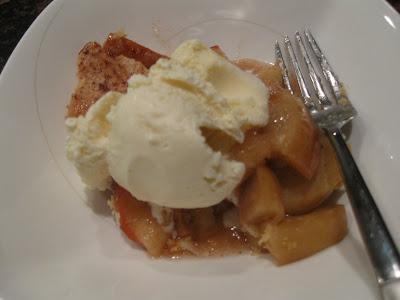
Ready to eat with some vanilla ice cream! YUMMMMM!


Thanks for joining me Luna! I can't wait to learn how to make your Abuelita's tortillas, frijoles y arroz! I was just so entertained to know that both of our grandmother's secret ingredients would be lard! ;) I guess we are both carrying on the tradition of knowing what makes things delicisous! I love it!


Cheers to carrying on delicious family traditions, no matter how fattening!!


xoxo,

Tipsy..and Luna!


Wednesday, November 4, 2009

Eet smakelijk, eet-het-met plezier!

In the Fall I just can't have enough pumpkin goodness and I wanted to make something that takes me back to my childhood. My mom was always baking something on a Saturday morning and many times it would be yummy pumpkin muffins. The recipe comes from our family cookbook which was compiled by my mom and aunts while I was literally a bun in the oven. My mom saved the books for my sister and I and we cherish the recipes! Look forward to some dutch delights in the future! There are some great ones in this book and I love to make them!
~
I just love the cover with my oh so Dutch great-grandparents. My grandpa was one of 12 kids and so there is much love that went into these recipes and into the food. I just can't imagine baking for 14 people every time I want some sweets! They would be gobbled up in no time and these muffins are no exception!


~

My sweet Aunt Glenda did all of the hand drawn art work within the book.


~
I am really am spilling all the family secrets!
~
1.5 cup sugar
1 cup oil ( I substitute half cup apple sauce and half cup oil-it is healthier and I like the hint of apple flavor -even more reminiscent of Fall!)
2 eggs
1.5 cup pumpkin
2.5 cup flour
1.5 teaspoon soda
1 teaspoon salt
1.5 teaspoon baking powder
1 teaspoon cinnamon (add some extra and a little nutmeg if you want)
.5 teaspoon vanilla
.5 cup raisins (optional)
~
~

Beat oil & sugar (and apple sauce if you are substituting) well. Add beaten eggs, pumpkin. Sift dry ingredients and add raisins and vanilla. Sprinkle muffins with sugar.
~
Bake for 20-25 minutes at 350 degrees.


~


~
YUMMMMM! I had to enjoy them with a cup of tea! My mom would be proud.

~
~
Cheers to family traditions, comfort food, and the crispy Fall weather!
~
xoxo,
Tipsy
p.s. The post title translates to "Tasty eats-eat with pleasure."


Thursday, October 29, 2009

Cookies for Breakfast

This week the temperature FINALLY dropped in the hot hot desert and I was oh-so ready for some Fall inspired treats! I LOVE pumpkin everything! I had already made my bossy cakes in anticipation of the crispy air and when it finally did arrived I wanted to try something new....how can you make pumpkin even yummier?-add chocolate!
~
~
I found this recipe for Pumpkin Chocolate Chip Cookies and I am so glad that I did!
~
1 cup butter
3/4 cups brown sugar
3/4 cup sugar
1 egg
1 tsp. vanilla
2 c. flour
1 tsp. baking soda
1 tsp. cinnamon ( I added a bit more-love love love cinnamon!)
1 c. pumpkin puree
1.5 c. chocolate chips (of course, I added more)
1 c. cooking oats
~
Cream butter & sugars
Add Egg & Vanilla
~
Combine flour, oats, baking soda, cinnamon
~
Stir dry ingredients into butter/sugar mixture alternately withe the pumpkin puree. Then add chocolate chips
~
Bake at 350 degrees for 11-12 minutes.
~
Can't wait to make some brandied cider to go with these sweet little babies!
~
~


These are so yummy and I must confess that I have been eating them for breakfast! I think the oats and pumpkin make them an acceptable breakfast food, what do you think?!


Cheers to being an adult and being able to eat cookies for breakfast...Next time I will call them pumpkin scones...the hubs won't know any better and then there will be more for me anyways. ;)
~
xoxo,
Tipsy

Tuesday, October 27, 2009

Red Velvet & Pink Champagne

One of the hub's best friends got married on Sunday. He was nice enough to volunteer a wedding cake (made by me, of course) as their wedding gift from us......ok, so I did tell him I would do it before he volunteered, but I have to give him a hard time after the fact.
~
I have never made a two tiered, stacked cake, covered in fondant with all kinds of details before. I was up for the challenge, but a little nervous.
~
The bottom tier is Red Velvet and the top tier is Pink Champagne. You would never know that there are such colorful cakes underneath all that butter cream and fondant, but it was a fun surprise for all the guests!
~
I started with the bottom tier, covered in butter cream and then added supports for the top tier. Watching the top tier sink right into the middle of the bottom tier would be my worst nightmare for this little sweet thang!
~
~


~

Fully supported-that top tier isn't going anywhere!

~

Then I covered both tiers with rolled fondant and started adding the accents.


~

~


~

Testing the supports. Yessss!!! So glad I did because it was only about 95 degrees on the wedding day!
~


~

The day before the wedding I cut some pieces for the bow accents on top of the cake so that they could dry over night.

~


I also made some ribbon roses for the topper just like I did here.


I made a sheet cake to make sure everyone could get a nice big piece of cake. I tested out my swirly skills here before trying it out on the wedding cake that everyone would see. By the time the guests would see this cake, it would be sliced and plated.


~
~


The final wedding cake! Thank you to the hubs for "supervising" the operation...no really, he did keep me sane on the three day operation....and he poured me a couple glasses of vino too!
~
~


~

Cutting the cake...

~


Congratulations Sarah & Darren! Have fun in Maui!
~
~
~


Cheers to toning your arms by rolling out fondant and to the hubs "supervising" and being my sommelier!
~
~
xoxo,
Tipsy